Modelling (C)WDM MUXes in NetBox/Nautobot – the universal way

A while ago we had a discussion in #DENOG on how to best model CWDM MUXes in NetBox/Nautobot, so they can be used to build a network topology, which can be leveraged for holistic automation, and are prepared for augments, repairs and network changes.

8Ch CWDM MUX

“Natural” way of modelling

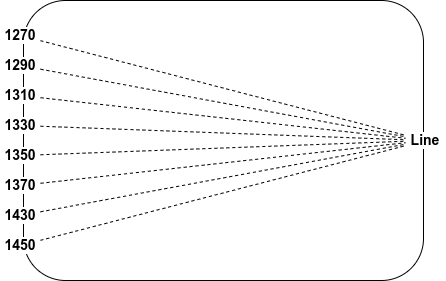
The “natural” way of modelling for example an 8Ch CWDM MUX – as shown above – would be do create a DeviceType containing one RearPort with 8 positions as well as 8 FrontPorts which map to one position each. So logically this would look like the following

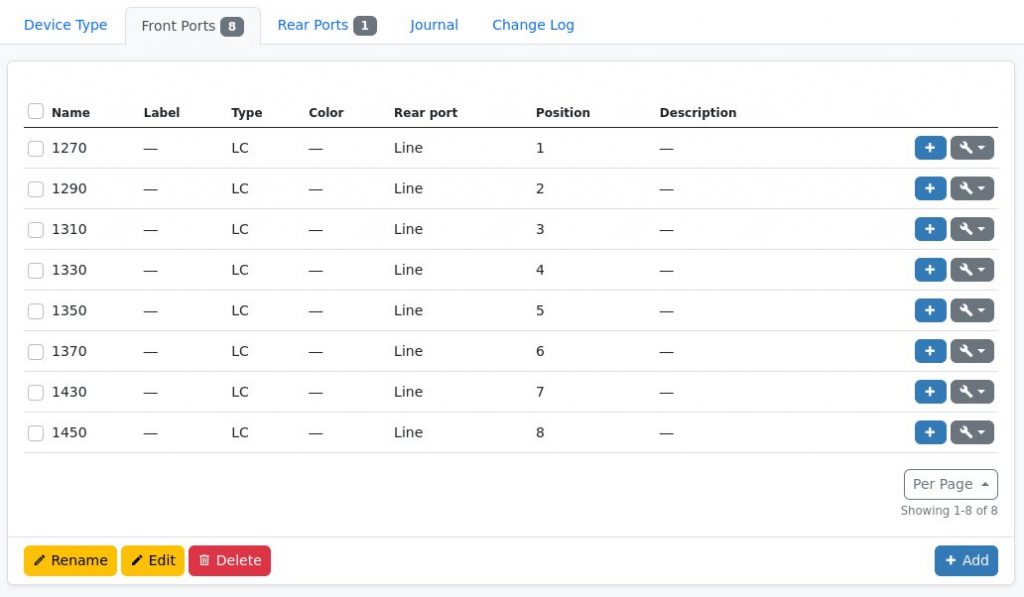
Inside NetBox the Rear Port and Front Ports view of the DeviceType could look like this

One Rear Port with 8 positions
Eight Front Ports mapped to one position each

This model absolutely works, allows tracing connections through the MUXes etc. as long as we always use exactly the same MUX on both ends of the fiber for a given WDM setup.

Limitations

If one MUX would decay over time and needs to be replaced by another model e.g. due to supply chain issues, this might get tricky. If the new MUX for example had 10 channels and does not skip 1390 and 1410, the mapping would fail. This obviously would also be the case if, e.g. for an expansion, the setup should be changed to 18Ch MUXes and this could only be done one side after another.

Universal way of modelling

As the ITU CWDM standard only defines 18 CWDM channels in total with a fixed spacing of 20nm we can use one simple trick to overcome this limitation: Always define all 18 positions and only map the existing Front Ports to their associated position as shown in the following table.

PositionChannel
1
1270
21290
31310
41330
51350
61370
71390
81410
91430
101450
111470
121490
131510
141530
151550
161570
171590
181610

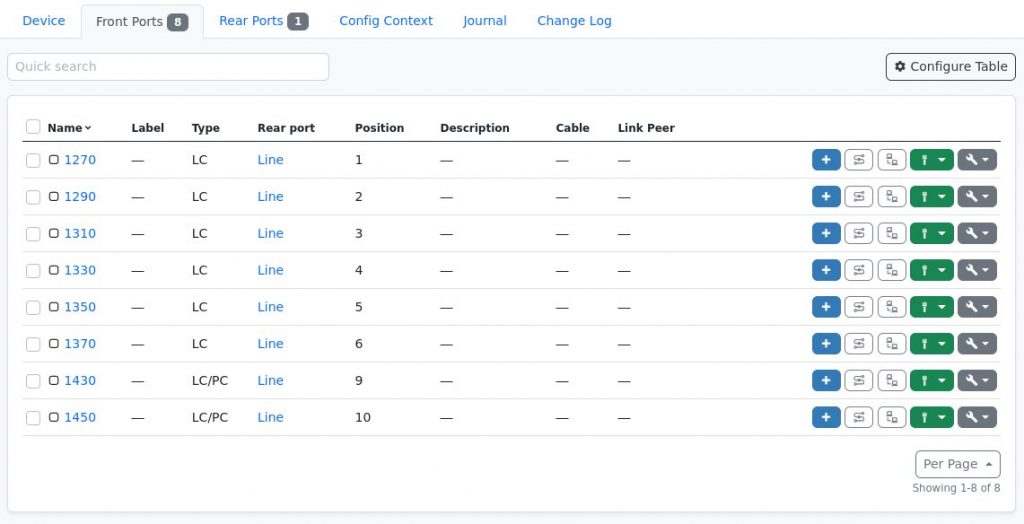
So the Front Ports of the MUX shown above would be mapped to positions 1-6, 9, and 10. This way all CWDM MUXes can be connected in NetBox/Nautobot and all channels which exist on both ends can be connected and traced through.

Eight Front Ports mapped to one their associate (existing) positions

What about DWDM?

For DWDM systems this obviously would be somewhat harder given the bigger amount of possible channels, especially when different spacing options (25, 50, 100GHz) are taken into account. It would be possible though to go for 160 positions and map the channels accordingly given strict adherence to a to be predefined map.

This is the way: Holistic approach on network automation

In the past months and years I’ve had a number of great discussion with a lot of fantastic networking people on how to (not) do network automation (at scale), what worked for them and what didn’t. At a smaller scale I made quite some experiences myself at previous roles as well as consulting engagements and in particular by building and operating the Freifunk Hochstift community ISP network plus it’s SDN. This article is the distilled result of those discussions and experiences and might be somewhat opinionated.

Network automation done right

Continue reading This is the way: Holistic approach on network automation

MPLS Lab – Playing with static LSPs and VRFs on Linux

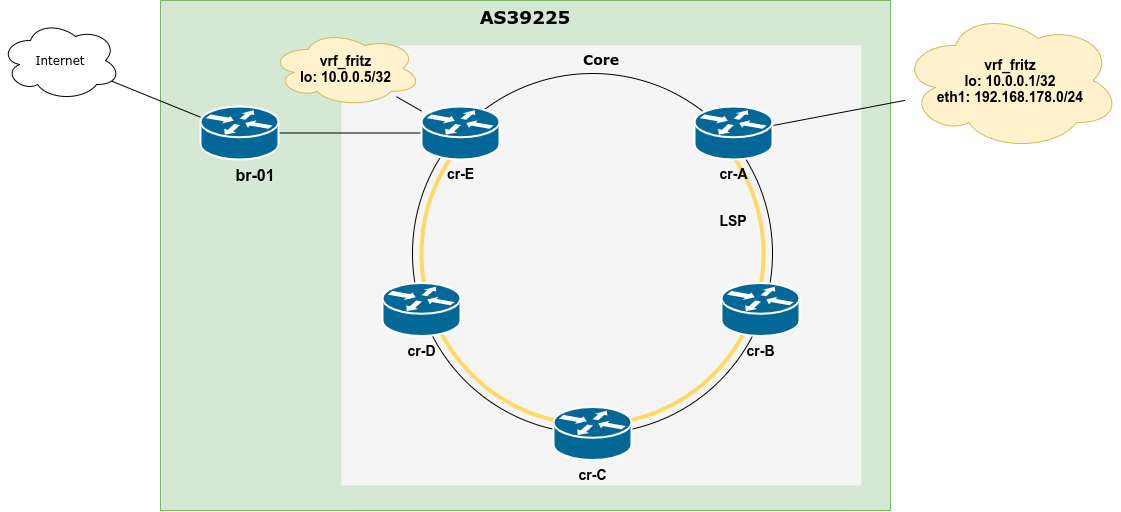
At DENOG13 I held a workshop Fun with PBR, VRFs and NetNS on Linux (in German) where I showcased forwarding IP packets within a VRF via static MPLS LSPs. I’ve been asked to publish the configuration for this lab, so here we are 🙂

Consider the following topology consisting of a core ring build with 5 routers, a border router (br-01) connected to core router E (cr-E) as well as to the Internet. All routers take part of OSPF area 0 and run iBGP with br-01 as the route reflector which is providing a default route. This is the same setup used for most of the FrOSCon Network Track.

Topology of MPLS lab
Continue reading MPLS Lab – Playing with static LSPs and VRFs on Linux

Custom Links in Netbox – Shortcut to device WebUI/IPMI

Netbox allows to create Custom Links to a number of models for a while now. I’ve been reminded of that feature quite recently and follow the idea to have a direct link on the device page which leads to the management interface of that device.

In the Freifunk Hochstift environment we have a number of wireless backbone links which happen to have issues now and then and require some love in that case. As we use lots of Ubnt gear that love has to be applied via the Web interface of the device which is reachable via the management IP, which is configured as the primary IP of the device in Netbox.

Up to now this meant searching for the device in Netbox and copy the IP address of the device in the browsers URL bar and hit return. This can be achieved much nicer with a custom link which directly points to https://primary_ip and is accessible via a button on the device page.

This can be achieved by creating a Custom Link in Netbox (Customization -> Custom Link) for the appropriate Content Type, Link text + URL. As the intention is to add a Custom Link to wireless backbone devices, the appropriate Content Type is DCIM > device. Button class allows to configure the color of the button.

Using a little Jinja2 in the Link text it’s possible to only show this link on WBBL devices and certain switches: If the expression(s) given there renders as empty text the link will not be shown. My first instinct was to check for the device role and manufacturer:

{% if obj.device_role.slug == 'wbbl' or
      obj.device_type.manufacturer.slug == 'netonix'
%}
WebUI
{% endif %}

But checking for the platforms makes more sense as that’s the primary indicator for the devices which are managed via a web interface and they may be used in different roles (we have wireless local links too for example):

{% if obj.platform.name in [ 'AirOS', 'Netonix' ] %}
WebUI
{% endif %}

As shown above the device or “thing” referenced by the Content Type is represented via the obj object and it’s attributes are directly accessible. A look into the API representation or the Django model(s) of the device (or “thing” for that matter) may help to figure out the correct name.

What I did not find in the docs nor API nor model is that how you can access the IP part of an IP address, which in Netbox always carries the netmask. While searching I stumbled across an issue and learned that the following is possible:

https://{{ obj.primary_ip4.address.ip }}

Netbox also allows to group custom links within a drop down. All links sharing the same Group name will show up in a drop down named like the group.

With those pieces it’s easily possible to create custom links for special devices which point to the primary IP and provide the OPS team with a few clicks solution in case of trouble. Thanks to Tim for the hint 🙂

Conditional SLAAC with bird – Only advertise default route if one is present on the router

When people want to deploy a Linux box as a 1st hop router in an IPv6 network RAdvd usually is the first choice for sending out Router Advertisments. The configuration is rather straight forward and on most distributions extensive example configuration files exist. Once configured RAdvd will silently do it’s job and happilly send out periodic RAs and answer any Router Solicitations, even thought the router itself may not have any network connectivity (anymore).

While designing the Freifunk Hochstift Backbone a while back I was looking for a way to only send out RAs with a default route if the router actually has one itself to prevent clients from getting broken IPv6 connectivity (and people complaining).

I found that the Bird Internet Routing Daemon – which already was in use for OSPF/BGP – also provides a ravd protocol which does what I wanted using a trigger. The following configuration will keep sending out RAs but will zero the router lifetime, which will allow clients to configure an IP address from this prefix but not use this router as default gateway, which is OK for my particular setup.

protocol radv {
    # ONLY advertise prefix, IF default route is available
    import all;
    export all;
    trigger ::/0;

    interface "vlan0815" {
        default lifetime 600 sensitive yes;

        prefix 2001:db8:23:42::/64 {
        preferred lifetime 3600;
    };
}

This is the default behaviour of the radv trigger but it can be fine tuned to your requirements:

trigger prefix

RAdv protocol could be configured to change its behavior based on availability of routes. When this option is used, the protocol waits in suppressed state until a trigger route (for the specified network) is exported to the protocol, the protocol also returns to suppressed state if the trigger route disappears. Note that route export depends on specified export filter, as usual. This option could be used, e.g., for handling failover in multihoming scenarios.

During suppressed state, router advertisements are generated, but with some fields zeroed. Exact behavior depends on which fields are zeroed, this can be configured by sensitive option for appropriate fields. By default, just default lifetime (also called router lifetime) is zeroed, which means hosts cannot use the router as a default router. preferred lifetime and valid lifetime could also be configured as sensitive for a prefix, which would cause autoconfigured IPs to be deprecated or even removed.

The radv protocol has a long list of knobs and switches for fine tuning, see the bird 1.6 and 2.0 documentation for further details.

DENOG12 Netbox workshop summary

One week ago DENOG12 took place virtually as an awesome venueless conference and I had the pleasure to hold a workshop about netbox and how to use it for automation. As promised here are the notes we collected while the workshop and projects that emerged since. This is provided as-is and as I don’t have used most of the external tools/scripts/reports/etc. linked below 🙂

Deployment

I forked the officiall netbox-docker GIT repository to set up netbox as a number of Docker containers and made some small changes, to run the PostgreSQL DB outside of Docker and restarte the container on Docker restarts / system reboots.

As the time of this writing this repo is configured for netbox version 2.9.8.

Device Types

The community Device Type library

Within the netbox-community organization on Github you can find the semi-official community Netbox Device Type library where a lot of Device Types are present and ready to be imported into your Netbox. Be aware that you have to create the Manufacturer first before you can import Device Types for that manufacturer. If you happen to create Device Types for devices which are no present in the library please open a PR – sharing is caring 🙂

Importing multiple Device Types at once

Someone mentioned this script/repository which offers the possibility to import multiple Device Types at once. (I didn’t test it yet :))

Reports and Scripts

This repository  hold a bunch of example Netbox Reports for various things within Netbox (circuits, Cabling, IPs/DNS, VMs, etc.) as well as Netbox Scripts to create a VM as well as a geolocator for a site.

My own netbox-scripts repository contains a script to populate a Freifunk Hochstift Backbone POP from one script.

This (archived) repository holds a bunch for tools to import/sync stuff into/with netbox.

Wikimedia seems to use Netbox, too and has open sourced some tooling including a zone file generator.

Other

Johannes wrote an article about adding own buttons within Netbox to open an SSH session into a router.

If you want to extent the authentication options of your Netbox there is a Plugin for SSO using SAML2.

A thread from the Google Group on setting custom fields via the API.

Deploying a Freifunk Hochstift backbone POP with Netbox Scripts

Some weeks ago Network to Code held the first (virtual) Netbox Day (YouTube playlist, Slides repo on github). John Anderson gave a great NetBox Extensibility Overview and introduced me to Netbox Scripts (Video, Slide deck, Slide 28) which allow to add custom Python code to add own procedures to netbox. I was hooked. About three to four hours of fiddling, digging through the docs, and some hundred lines of Python later I had put together a procedure to provision a complete Freifunk Hochstift Backbone POP within Netbox according to our design. I’m going to share my proof of concept code here and  walk you through the key parts of the script.

Netbox scripts provide a great and really simple interface to codify procedures and design principles which apply to your infrastructure and fire up complex network setups within netbox by just entering a set of config parameters in a form like the following and a click of one button.

Provision Backbone POP form

Continue reading Deploying a Freifunk Hochstift backbone POP with Netbox Scripts

Using QSFP-SFP+ adapters / break out cables with Cumulus Linux

As the two SFP+ ports of EdgeCore AS7726-32X aren’t supported by Cumulus Linux I had to use QSFP+-SFP+ adapters to make the 10G links work. As expected the port has be put in 10G mode to make this work, setting the link-speed isn’t enough though.

Configure the ports mode

Each port has it’s mode set in /etc/cumulus/ports.conf. This file looks like something like this:

# ports.conf --
#
# The Accton AS7726 has:
#
# 32 QSFP28 ports numbered 1-32
# These ports are configurable as 100G, 40G, or split into
# 4x25G, or 4x10G ports.
#

# QSFP28 ports
#
# <port label 1-32> = [4x10G|4x25G|40G|100G]

1=100G
2=100G
3=100G
4=100G
5=100G
[...]

Using a QSFP+-SFP+ adapter now warrants 4x10G mode as this is the only mode breaking the port down in 10G ports although there is only one port.

To configure ports 29 and 30 accordingly the corresponding lines have to be set to

29=4x10G
30=4x10G

For these changes to take effect the swichtd service has to be restarted to program this into hardware. This is done by restarting the systemd service

systemctl restart switchd.service

Broken down interfaces will show up as swp<num>s<instance> (e.g. swp29s0) and should now be visible in the interface list

# ip -br l
[...]
swp29s0 UP   68:21:5f:39:19:b4 <BROADCAST,MULTICAST,UP,LOWER_UP> 
swp29s1 DOWN 68:21:5f:39:19:b5 <BROADCAST,MULTICAST> 
swp29s2 DOWN 68:21:5f:39:19:b6 <BROADCAST,MULTICAST> 
swp29s3 DOWN 68:21:5f:39:19:b7 <BROADCAST,MULTICAST> 
swp30s0 UP   68:21:5f:39:19:b8 <BROADCAST,MULTICAST,UP,LOWER_UP> 
swp30s1 DOWN 68:21:5f:39:19:b9 <BROADCAST,MULTICAST> 
swp30s2 DOWN 68:21:5f:39:19:ba <BROADCAST,MULTICAST> 
swp30s3 DOWN 68:21:5f:39:19:bb <BROADCAST,MULTICAST>

Configure the interface(s)

The break out interfaces no can be configured as usually by /etc/network/interfaces 

auto swp29s0
iface swp29s0
    address 198.51.100.0/31
    address 2001:db8:2342:F000::1/126


auto swp30s0
iface swp30s0
    address 198.51.100.2/31
    address 2001:db8:2342:F001::1/126

Those interface can be brought up with

# ifup swp29s0
# ifup swp30s0

or

# ifup -a

or

# ifreload -a

as you like 🙂

Initial setup for Cumulus Linux for networkers

I just had to set up Cumulus Linux on some EdgeCore AS7726-32X boxes and were a little underwhelmed by the available documentation. So this is my take at an initial setup guide.

Access to the switch

Assuming Cumulus is preinstalled on the box you have two ways to access the switch

by serial console

Fire up your minicom/screen/putty/whatever at 115200 and you will be greeted with a login prompt

by ssh via the mgmt interface

By default Cumulus Linux does dhcp on the mgmt interface(s), so you can ssh into the box by the IP given by DHCP.

The default credentials are

user: cumulus
pass: CumulusLinux!

Root access can be gained via sudo -i using the password from above.

Changing the password

cumulus@sw-01:~$ passwd
Changing password for cumulus.
(current) UNIX password: 
Enter new UNIX password: 
Retype new UNIX password:

Changing the hostname

As Cumulus Linux basically is a Debian Linux changing the hostname is easy and done in two steps:

# hostnamectl set-hostname <new-hostname>

Edit /etc/hosts and change the following line

127.0.1.1 cumulus

to

127.0.1.1 <fqdn> <hostname>

Setting up management in VRF

Edit /etc/network/interfaces with you favorite editor (vi and nano are present) and change the stanza for eth0 like the following

# The primary network interface
auto eth0
iface eth0
    address 192.0.2.11/24
    gateway 192.0.2.1
    #
    vrf vrf_mgmt

auto vrf_mgmt
iface vrf_mgmt
    #
    vrf-table auto

This will move interface eth0 into VRF vrf_mgmt which seperates routing from the main routing table. vrf-table auto let’s ifupdown2 decide on which Linux routing table it will use for the VRF. If you want to have a fixed table id you can specify that instead of auto. Note ifupdown2 by default requires VRF table ids to be over 1000.

ifup eth0 will bring up the new config on eth0 as well as the VRF. Another way to reload the interface configuration would be ifreload -a which would reload the configuration of all interfaces.

Setting up routed interfaces

Setting up IPs on interfaces happens in /etc/network/interfaces, too. The ports are numbered swp<num> with no leading zeros. Setting IPs on switchport 1 would look like this:

auto swp1
iface swp1
    address 198.51.100.0/31
    address 2001:db8:2342:F000::1/126

Testinglos durch die Nacht…

Aus Gründen, die Euch nur noch mehr verunsichern würden, war es gerade alternativlos, diese Freifunkhymne zu bauen:

Wir ziehen durch die Knoten und die POPs dieser Stadt
Das ist unsre' Firmware, wie für uns alle gemacht
Oho Oho

Ich schließe meinen Browser, lösche jedes Cookie,
Gehe auf den Knot'n, so wie ich's im-mer tu'
Oho Oho

Was das zwischen uns auch ist, Links, die man nie vergisst
Und Dein Link hat mir gezeigt, das ist unser Mesh

Testinglos, durch die Nacht,
Bis ein neuer Build erwacht
Stablelos, einfach raus
Deine Knoten geh'n nicht aus!
Testinglos durch die Nacht
Spür was Gluon mit uns macht
Stablelos, signkeyfrei, großes Update für uns zwei
Wir sind heute ewig, tausend neue Knoten
Alles was ich hab, teil' ich mit Euch
Wir sind unzertrennlich, irgendwie verbunden
Komm nimm' meinen Link und mesh mit mir

Komm wir steigen auf das nächste Dach dieser Stadt
Schrauben einfach an was uns zusammen bringt
Oho oho

Bist Du richtig süchtig, Dish an Dish ganz verlinkt
Strahl in meine Schüssel und der Link geht an
Oho oho

Alles was ich will
Ist da, großer Uplink pur, ganz nah
Nein wir wollen hier nicht weg, alles ist perfekt

Testinglos durch die Nacht
Spür was Gluon mit uns macht
Stablelos, signkeyfrei, großes Update für uns zwei
Wir sind heute ewig, tausend neue Knoten
Alles was ich hab, teil' ich mit Euch
Wir sind unzertrennlich, irgendwie verbunden
Komm nimm' meinen Link und mesh mit mir
Testinglos

Funk pulsiert in meiner Hand
Testinglos durch die Nacht
Spür was Gluon mit uns macht
Stablelos, signkeyfrei, großes Update für uns zwei
Wir sind heute ewig, tausend neue Knoten
Alles was ich hab, teil' ich mit Euch
Wir sind unzertrennlich, irgendwie verbunden