Hardware platforms of a Freifunk network

This post is part of the series Building your own Software Defined Network with Linux and Open Source Tools and covers the hardware platforms used within the backbone network infrastructure.

In the early days into the project we didn’t have much funds but thankfully received quite some donations in terms of old hardware as well as money. As we were young and didn’t know what we know today, we went down quite some different roads, made lots of experiences along the way, eventually reaching the setup we have today. This posts lists most the platforms we used within the last years, basically only leaving out early wireless platforms and sponsored server machines.

As most Freifunk communities rely heavily on products from the portfolio of Ubiquiti Networks, quite some devices will be covered. In the following I will just call them ubnt.

Continue reading Hardware platforms of a Freifunk network

Using QSFP-SFP+ adapters / break out cables with Cumulus Linux

As the two SFP+ ports of EdgeCore AS7726-32X aren’t supported by Cumulus Linux I had to use QSFP+-SFP+ adapters to make the 10G links work. As expected the port has be put in 10G mode to make this work, setting the link-speed isn’t enough though.

Configure the ports mode

Each port has it’s mode set in /etc/cumulus/ports.conf. This file looks like something like this:

# ports.conf --
#
# The Accton AS7726 has:
#
# 32 QSFP28 ports numbered 1-32
# These ports are configurable as 100G, 40G, or split into
# 4x25G, or 4x10G ports.
#

# QSFP28 ports
#
# <port label 1-32> = [4x10G|4x25G|40G|100G]

1=100G
2=100G
3=100G
4=100G
5=100G
[...]

Using a QSFP+-SFP+ adapter now warrants 4x10G mode as this is the only mode breaking the port down in 10G ports although there is only one port.

To configure ports 29 and 30 accordingly the corresponding lines have to be set to

29=4x10G
30=4x10G

For these changes to take effect the swichtd service has to be restarted to program this into hardware. This is done by restarting the systemd service

systemctl restart switchd.service

Broken down interfaces will show up as swp<num>s<instance> (e.g. swp29s0) and should now be visible in the interface list

# ip -br l
[...]
swp29s0 UP   68:21:5f:39:19:b4 <BROADCAST,MULTICAST,UP,LOWER_UP> 
swp29s1 DOWN 68:21:5f:39:19:b5 <BROADCAST,MULTICAST> 
swp29s2 DOWN 68:21:5f:39:19:b6 <BROADCAST,MULTICAST> 
swp29s3 DOWN 68:21:5f:39:19:b7 <BROADCAST,MULTICAST> 
swp30s0 UP   68:21:5f:39:19:b8 <BROADCAST,MULTICAST,UP,LOWER_UP> 
swp30s1 DOWN 68:21:5f:39:19:b9 <BROADCAST,MULTICAST> 
swp30s2 DOWN 68:21:5f:39:19:ba <BROADCAST,MULTICAST> 
swp30s3 DOWN 68:21:5f:39:19:bb <BROADCAST,MULTICAST>

Configure the interface(s)

The break out interfaces no can be configured as usually by /etc/network/interfaces 

auto swp29s0
iface swp29s0
    address 198.51.100.0/31
    address 2001:db8:2342:F000::1/126


auto swp30s0
iface swp30s0
    address 198.51.100.2/31
    address 2001:db8:2342:F001::1/126

Those interface can be brought up with

# ifup swp29s0
# ifup swp30s0

or

# ifup -a

or

# ifreload -a

as you like 🙂
Initial setup for Cumulus Linux for networkers

I just had to set up Cumulus Linux on some EdgeCore AS7726-32X boxes and were a little underwhelmed by the available documentation. So this is my take at an initial setup guide.

Access to the switch

Assuming Cumulus is preinstalled on the box you have two ways to access the switch

by serial console

Fire up your minicom/screen/putty/whatever at 115200 and you will be greeted with a login prompt

by ssh via the mgmt interface

By default Cumulus Linux does dhcp on the mgmt interface(s), so you can ssh into the box by the IP given by DHCP.

The default credentials are

user: cumulus
pass: CumulusLinux!

Root access can be gained via sudo -i using the password from above.

Changing the password

cumulus@sw-01:~$ passwd
Changing password for cumulus.
(current) UNIX password: 
Enter new UNIX password: 
Retype new UNIX password:

Changing the hostname

As Cumulus Linux basically is a Debian Linux changing the hostname is easy and done in two steps:

# hostnamectl set-hostname <new-hostname>

Edit /etc/hosts and change the following line

127.0.1.1 cumulus

to

127.0.1.1 <fqdn> <hostname>

Setting up management in VRF

Edit /etc/network/interfaces with you favorite editor (vi and nano are present) and change the stanza for eth0 like the following

# The primary network interface
auto eth0
iface eth0
    address 192.0.2.11/24
    gateway 192.0.2.1
    #
    vrf vrf_mgmt

auto vrf_mgmt
iface vrf_mgmt
    #
    vrf-table auto

This will move interface eth0 into VRF vrf_mgmt which seperates routing from the main routing table. vrf-table auto let’s ifupdown2 decide on which Linux routing table it will use for the VRF. If you want to have a fixed table id you can specify that instead of auto. Note ifupdown2 by default requires VRF table ids to be over 1000.

ifup eth0 will bring up the new config on eth0 as well as the VRF. Another way to reload the interface configuration would be ifreload -a which would reload the configuration of all interfaces.

Setting up routed interfaces

Setting up IPs on interfaces happens in /etc/network/interfaces, too. The ports are numbered swp<num> with no leading zeros. Setting IPs on switchport 1 would look like this:

auto swp1
iface swp1
    address 198.51.100.0/31
    address 2001:db8:2342:F000::1/126

Arista’s not Cisco – Nifty CLI features

At GPN18 we had an Arista DCS-7280SR as our core and border router. The Cisco-like CLI made it easy to configure the system as I know my way around IOS*.

While setting up the final BGP sessions to our upstreams at the GPN18 we by accident found out that Arista supports watch on their CLI which is quite awesome when you want to see if your peering are coming up.

router> watch sh ip bgp summary

The next thing Arista can do which Cisco can’t is show active. When you are in a config stanza like an interface, access-list or router bgp 13020, you can print the current configuration of this sub-tree; in configure mode! This is something every Cisco admin would love to have as it’s not possible to do a show running-config <thingy> for most parts of the config tree and you have to fiddle around with show running-config | section <something>.

As we grew fond of show active really fast we wanted to use it to verify our access-list changes etc. and were wondering why they didn’t show up in show active directly after attemping the chance.

core-hfg#sh ip access-lists bgp
IP Access List bgp
 10 permit tcp host 1.2.3.4 any eq bgp
 20 permit tcp host 2.3.4.5 any eq bgp
 30 permit tcp host 3.4.5.6 any eq bgp

core-hfg#conf t
core-hfg(config)#ip access-list bgp
core-hfg(config-acl-bgp)#40 permit tcp host 9.8.7.6 any eq bgp
core-hfg(config-acl-bgp)#show active 
ip Access List bgp
 10 permit tcp host 1.2.3.4 any eq bgp
 20 permit tcp host 2.3.4.5 any eq bgp
 30 permit tcp host 3.4.5.6 any eq bgp

It turns out some config changes only get active when you leave the block you were editing, which is another subtle difference to Ciscos behavior!

core-hfg(config-acl-bgp)#exit
core-hfg(config)#ip access-list bgp
core-hfg(config-acl-bgp)#show active 
ip Access List bgp
 10 permit tcp host 1.2.3.4 any eq bgp
 20 permit tcp host 2.3.4.5 any eq bgp
 30 permit tcp host 3.4.5.6 any eq bgp
 40 permit tcp host 9.8.7.6 any eq bgp

Update:

Some changes are applied immediately on interface level, for example (no) shut, VLAN changes, … These are visible in show active as expected. Thanks for Nico for the clarification!

Anycasted services with Debian, bird, anycast-healthchecker and Cisco Nexus 7000

A while ago we started getting alerts, that one of our Kerberos KDCs had problem with the Kerberos database replication. A little digging revealed, that the problems are caused by load spikes on the KDC which were the result of a burst of legitimate queries fired by some systems we didn’t have much control over. Additionally we found that the MIT Kerberos implementation queries all KDCs provided in the configuration file in sequential order, so the first KDC get’s nearly all queries. While thinking about load balancing solutions, quickly anycast came to mind, so we decided to set it up. Anycast leverages the Equal Cost Multipath Routing (ECMP)  capability of common routers to distribute traffic to multiple next-hops for the same destination.

The solution consists of three corner stones:

  1. anycast-healtchecker as a means to check service availability
  2. bird as a BGP speaker on the KDCs and route reflectors
  3. Data center routers (Cisco Nexus 7010) speaking BGP to the route reflectors

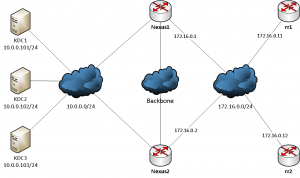
The topology is as follows:

Topology KDCs

Continue reading Anycasted services with Debian, bird, anycast-healthchecker and Cisco Nexus 7000