Many folks and organizations are running their own Certificate Authority (CA) internally, to manage certificates for internal services and (infrastructure) devices, which won’t ever be exposed to regular users. Some manage those CAs manually, e.g., via OpenSSL directly, or via tools like easyrsa, cfssl, etc.
In the Freifunk Hochstift infrastructure, we use an internal CA for host certificates (e.g., used for Icinga2), internal services like LDAP, OpenVPN, NetBox, IPMIs, etc. The CA is managed by some helper scripts directly calling the openssl binary. When I created the CA back in 2015 I didn’t think much about the expiry date, set it to 10 years from then, and focused on the infrastructure to be set up. I’ve also set up monitoring for the certificates of the services, we deployed, but did not set up monitoring for the CA expiry.
So here we are, and recently, those 10 years were up, and our OpenVPN used for managed access stopped failing because it couldn’t connect to the Anycasted LDAP servers. All 4 instances failing at once was wild and didn’t make much sense. Some debugging revealed problems to be related to SSL/TLS, yet the service certificates were OK. After a while, I figured out the CA had expired, but now what?
Turns out, you can build a new certificate from an existing key and get yourself unstuck. As this journey wasn’t very pleasant, I stumbled across some mostly-but-not-fully-working articles out there, and had to dive into /usr/lib/ssl/misc/CA.pl, here’s the way I got myself out of this mess.
After I upgraded my IRC-host to the next Debian release, I rebooted the box, restarted the IRC and mail client to get things back up again, and wanted to log into my mailbox again. I pasted the password from the password store into mutt (running inside screen) as I had always done and got login failed. Wat?
The IMAP login still worked fine via Thunderbird or mobile app from other devices, and dovecot wasn’t logging anything related to the failed login attempts from mutt. Wat?!
When I start mutt directly on that very box, so outside screen, login works just fine, too. WAT?
So, enable some verbose auth logging in dovecot, including incorrect passwords in plain text, to see what’s going on here:
# From /etc/dovecot/dovecot.conf

# Verbose logging for authentication things
auth_verbose = yes

# Log passwords from invalid logins in plaintext, use carefully!
auth_verbose_passwords = plain
With that in place, I could see, that the password pasted into mutt‘s password prompt, when running inside screen, resulted in the password being prepended by 200~ and having a trailing 201~, WAT?!
Noting my findings in the DENOG IRC channel, someone pointed me to Bracketed-paste, which explained the control characters I was seeing. Without that pointer in the right direction, I would have search way longer – I love the DENOG and Open Source communities 💜.
ESC [ 200 ~ to signify the beginning of pasted text and
Many, many years ago, I was introduced to Hammerfall, and especially their album Crimson Thunder, with the song of the same name. At that time, we did a lot Freifunk installations and crimped a lot of cables. On the way back from one of those installations, I heard said album, and it struck me: They are singing about the Crimpson Thunder, so had to look into the text, and see what can be done about it, and here we are.
I present: The Crimpson Thunder – networker’s version:
We are the packets in the dark Inside the fiber we are the Eternal Spark that will guide the way
We are the stars up in the sky We gather winds so you can fly We are the beam when you’re sending
All your links can come up Where do we go? We’re just a next-hop away
Follow the signs of the Crimpson Thunder We will stay by your side Let our labels be there to guide you
We are the forces in the rain Inside your net, we are the unending answer to all your pings So take a step towards the shell The Crimpson sky fulfills the night The revelation is near
All your links can come up here do we go? We’re just a next-hop away
Follow the signs of the Crimpson Thunder We will stay by your side Let our labels be there to guide you
Guitar solo
All your links can come up Where do we go? We’re just a next-hop away
Guitar solo
Follow the signs of the Crimpson Thunder Follow the signs of the Crimpson Thunder Follow the signs of the Crimpson Thunder We will stay by your side Let our labels be there to guide you
Follow the signs of the Crimpson Thunder We will stay by your side Let our labels be there to guide you Follow the signs of the Crimpson Thunder We will stay by your side Let our labels be there to guide you
With WireGuard having found its way into the Linux kernel and all major distributions out there, we’ve got a pretty powerful new card into our decks, that we can play when we’re in need of a VPN solution. The website emphasizes the aim for performance, simplicity, and avoiding headaches, which reality seems to mostly agree with.
As long as WireGuard required to build kernel modules, e.g. by using DKMS, I wasn’t very interested (as I’m not a fan of compilers present on my servers). However, as this need went away, I got curious.
Linux has been a first class networking citizen for quite a long time now. Every system running a Linux kernel out of the box has at least three routing tables and is supporting multiple mechanisms for advanced routing features – from policy based routing (PBR), to VRFs(-lite), and network namespaces (NetNS). Each of these provide different levels of separation and features, with PBR being the oldest one and VRFs the most recent addition (starting with Kernel 4.3).
This article is the third part of the Linux Routing series and will provide an overview on Virtual Routing and Forwarding (VRFs) and its applications. The first post in the series about Linux Routing Fundamentals covers the basics and plumbings of Linux routing tables, what happens when an IP packet is sent from or through a Linux box, and how to figure out why. The second post on Policy-based routing covers the concepts and plumbing of PBR on Linux. Both are a good read if you don’t feel familiar with these topics and provide knowledge about corner stones referenced here.
Linux has been a first class networking citizen for quite a long time now. Every system running a Linux kernel out of the box has at least three routing tables and is supporting multiple mechanisms for advanced routing features – from policy based routing (PBR), to VRFs(-lite), and network namespaces (NetNS). Each of these provide different levels or separation and features, with PBR being the oldest one and VRFs the most recent addition (starting with Kernel 4.3).
This article is the second part of the Linux Routing series and will provide an overview on Policy-based routing (PBR) and its applications. The previous post about Linux Routing Fundamentals covers the basics and plumbings of Linux routing tables, what happens when an IP packet is sent from or through a Linux box, and how to figure out why. It is a good read if you don’t feel familiar with these topics. Posts about VRFs and Network Namespaces will follow.
Linux has been a first class networking citizen for quite a long time now. Every system running a Linux kernel out of the box has at least three routing tables and is supporting multiple mechanisms for advanced routing features from policy based routing (PBR), to VRFs(-lite), and network namespaces (NetNS). Each of these provide different levels or separation and features, with PBR being the oldest one and VRFs the most recent addition (starting with kernel 4.3).
This article is the first part of the Linux Routing series and will provide an overview of the basics and plumbings of Linux routing tables, what happens when an IP packet is sent from or through a Linux box, and how to figure out why. It’s the baseline for future articles on PBR, VRFs, and NetNSes, their differences as well and applications.
If you are like me and have some systems with fully encrypted disks, where you can’t or don’t want to be physically present for a system (re)boot, or which don’t have OOBM/KVM/CIMC access, this might be for you!
Having a look at how the generic disk decryption works on Debian-based systems, but likely also on others, is to add a script into the init-ramdisk (or initrd) which wraps a call to cryptsetup luksOpen for a given device(s).
So we can use the same mechanism to set up an SSH daemon within the initrd, configure the network so we can get administrative access, and then unlock the disks remotely. The only two things we have to do are to make sure all the plumbing is added to the initrd and the script is started before the regular interactive disk unlock script gets executed.
For Debian-based systems I’ve build this a while ago and finally Open Sourced it as fluffy-unluks on GitHub.
The add-unluks script set ups sshd and the required environment (NSS, etc.) for it to run as well as installing potentially needed Kernel modules for advanced network configs when building a new initrd.
The unluks script will be run on boot-up, configure the network as needed (including an LACP LAG and/or VLAN sub-interface, if desired), start the SSH server and wait for you to unlock the disks. If all configured disks have been unlocked – by checking for existing block devices or LVM volume groups – the temporary network configured is purged, sshd stopped and the system resumes the normal boot.
An optional safeword can be configured to instruct the unluks script to do nothing so the regular boot sequence will be used.
Although NetBox has a pretty nice data model and a lot of things found in common environments can be modelled pretty well, it sometimes reaches its limits. In such situations, you’re faced with multiple options to go forward
Introduce (a number of) custom field(s) to extend the data model
Write a plugin to extend the data model (and logic)
Introduce a (set of) tag(s) to allow users to place bumper stickers on things
File a feature request to add some generic missing feature
In this post we’ll look into options for using Tags to denote characteristics of devices, VMs, interfaces, prefixes, IPs, etc.
Simple labels
Sometimes it’s enough to just label a device, an interface, etc. with a static bit of information. Examples would be
Enable backup on this device (e.g. tag backup)
Enable DHCP on this interface (e.g. tag DHCP)
Mark an interface as planned or offline (e.g. tags planned or offline)
Denote an interface is of type Wireguard (e.g. tag Wireguard)
etc.
For those cases you can create a tag, e.g. planned, and apply it to any interface which is configured in NetBox, should be configured on the device but isn’t connected yet, so that effectively you can push down (parts of) the interface configuration to the device but inhibit alarms for it being offline or IGP adjacencies being down. The same is true for device which need to be backed up, etc.
One way of thinking of these example is as a boolean switch, which is set to true if the tag is applied. This is easy for cases where the “false” value is the default, so only the outliers – meaning “true” values – need to be represented explicitly.
Semantic labels
But what to do when there is a need for a tri-state value, e.g. true, false, unset, with unset being the default?
One example would be a part of an SDN controller which figures out if uRPF should be enabled on a given interface or not. This usually can be done programmatically, but in some situations an explicit override may be required. That’s where – what I would call them – Semantic Labels come in!
This means, that we also put the value we want to assign a given label into the tag. In this case, we create two labels called urpf=on as well as urpf=off (or urpf=enable and urpf=disable as you fancy) and apply these to any interface requiring an explicit override. If no tag is present, the code decides about the fate of uRPF.
Why not use custom fields?!
At this point you may be wondering “Why bother?” Just create a custom field, you can provide the allowed options and get input validation for free!
The reason is that if you go down this path, you can create a fairly long list of custom fields in the UI (and API) which are likely not set for the majority of your interfaces (in this example). This creates clutter within the UI and is likely to confuse users, especially if you end up with a number of custom fields.
My rule of thumb is, that I only create a custom field if it’s relevant for all or at least the majority of entities of a given kind. For example, if you wanted to store the data center tier of all the DC (read: Sites) you are present in, it might make sense to store this information as a custom field on the Site model, with a predefined list of values (1 – 4).
More examples
In the example above we could also have created two labels, e.g. uRPF enable and uRPF disable and let our automation handle the differentiation – which actually is how the FFHO SDN is built as of today.
For other bits of information, with more possible values, the benefits of the key=value approach can shine, for example if you want to
explicitly set the OSPF cost of an interface (e.g. ospf_cost=100)
store the maximum capacity of VRFs of a box (e.g. capacity=62 for a box with a Mellanox Spectrum 1 ASIC with a default + mgmt VRF in place)
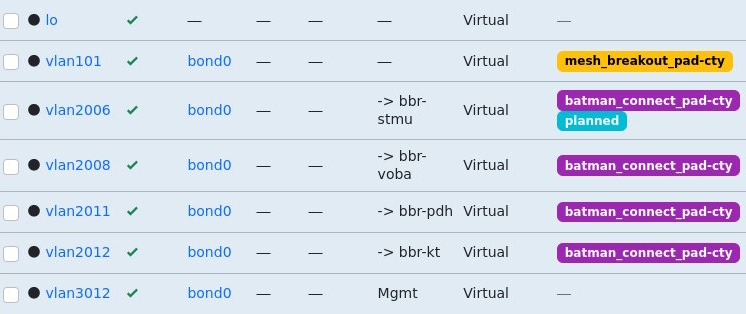
Although I now prefer the key=value approach as it’s easy to recognize and parse, you can obviously place values in labels by following any common format you define. For the Freifunk Hochstift Backbone I introduced labels of the format batman_connect_<instance_name> (e.g. batman_connect_pad-cty) to enable B.A.T.M.A.N. adv. overlay for a given instance on a tagged interface.
NetBox interface overview with Tags
The next level – prefix lists
Oliver – takt – Geiselhardt-Herms took this to the next level in a previous role and created tags with a hierarchical naming structure for prefixes, following the format prefix-list=key1:key2:key3…
The idea is that any prefix with a prefix-list tag with value key1:key2:key3 is added into the prefix lists name
key1:key2:key3
key1:key2
key1
An example structure could be
<VRF>:<purpose>:<label>, e.g. INTERNET:CUSTOMER:<customer name here>
<purpose>:<region>:<device>, e.g. CUSTOMERS:DE:core01.fra01
etc.
This obviously can be extended to more levels if it were to be required.
Recently I wrote a script which aids in provisioning things inside our network, which will do some sanity checks and if all is good set up a number of things (prefixes, IPs, sub-interfaces, IPs on them, etc.). The reason to do this inside a script is to do this in an atomic operation, so either the full provision process is done, or nothing is changed at all.
If the sanity checks fail (invalid input, trying to create something with overlapping resources, etc.) the script should fail and ideally report a clear error message on what was wrong, which should be reported to the caller (via API).
Now I was looking into exiting the script on an error and only found the option to throw any Exception which will produce a stack trace of all internal Exceptions which had been caught and handled. There is a AbortTransaction Exception, which allows terminating the script and thereby the DB transaction, but it was not designed to carry an error message.
Looking into the code, it seemed like adding support to gracefully abort a would be rather straight forward to add, so I did (issue, PR). Today the PR got merged and NetBox v3.4.4 (and later) includes the AbortScript exception to elegantly abort scripts, which you can use like this:
from utilities.exceptions import AbortScript

if some_error:
     raise AbortScript("Some meaningful error message")