Semantic Tags in NetBox

Although NetBox has a pretty nice data model and a lot of things found in common environments can be modeled pretty well, it sometimes reaches its limits. In such situations you’re faced with multiple options to go forward

  1. Introduce (a number of) custom field(s) to extend the data model
  2. Write a plugin to extend the data model (and logic)
  3. Introduce a (set of) tag(s) to allow users to place bumper stickers on things
  4. File a feature request to add some generic missing feature

In this post we’ll look into options for using Tags to denote characteristics of devices, VMs, interfaces, prefixes, IPs, etc.

Simple labels

Sometimes it’s enough to just label a device, an interfaces, etc. with a static bit of information. Examples would be

  • Enable backup on this device (e.g. tag backup)
  • Enable DHCP on this interface (e.g. tag DHCP)
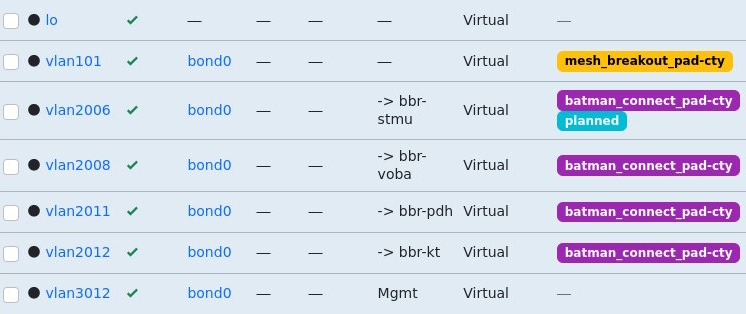
  • Mark an interface as planned or offline (e.g. tags planned or offline)
  • Denote an interface is of type Wireguard (e.g. tag Wireguard)
  • etc.

For those cases you can create a tag, e.g. planned, and apply it to any interface which is configured in NetBox, should be configured on the device but isn’t connected yet, so that effectively you can push down (parts of) the interface configuration to the device but inhibit alarms for it being offline or IGP adjacencies being down. The same is true for device which need to be backed up, etc.

One way of thinking of these example is as a boolean switch, which is set to true if the tag is applied. This is easy for cases where the “false” value is the default, so only the outliers – meaning “true” values – need to be represented explicitly.

Semantic labels

But what to do when there is a need for a tri-state value, e.g. true, false, unset, with unset being the default?

One example would be a part of an SDN controller which figures out if uRPF should be enabled on a given interface or not. This usually can be done programmatically, but in some situations an explicit override may be required. That’s where – what I would call them – Semantic Labels come in!

This means, that we also put the value we want to assign a given label into the tag. In this case, we create two labels called urpf=on as well as urpf=off (or urpf=enable and urpf=disable as you fancy) and apply these to any interface requiring an explicit override. If no tag is present the code decides about the fate of uRPF.

Why not use custom fields?!

At this point you may be wondering “Why bother? Just create a custom field, you can provide the allowed options and get input validation for free!

The reason is that if you go down this path, you can create a fairly long list of custom fields in the UI (and API) which are likely not set for the majority of you interfaces (in this example). This creates clutter within the UI and is likely to confuse users, especially if you end up with a number of custom fields.

My rule of thumb is, that I only create a custom field if it’s relevant for all or a least the majority of entities of a given kind. For example, if you wanted to store the data center tier of all the DC (read: Sites) you are present in, it might make sense to store this information as a custom fields on the Site model, with a predefined list of values (1 – 4).

More examples

In the example above we could also have created two labels, e.g. uRPF enable and uRPF disable and let our automation handle the differentiation – which actually is how the FFHO SDN is built as of today.

For other bits of information, with more possible values, the benefits of the key=value approach can shine, for example if you want to

  • explicitly set the OSPF cost of an interface (e.g. ospf_cost=100)
  • store the maximum capacity of VRFs of a box (e.g. capacity=62 for a box with a Mellanox Spectrum 1 ASIC with a default + mgmt VRF in place)

Although I now prefer the key=value approach as it’s easy to recognize and parse, you can obviously place values in labels by following any common format you define. For the Freifunk Hochstift Backbone I introduced labels of the format batman_connect_<instance_name> (e.g. batman_connect_pad-cty) enable B.A.T.M.A.N. adv. overlay for a given instance on a tagged interface.

NetBox interface overview with Tags

The next level – prefix lists

Oliver – takt – Geiselhardt-Herms took this to the next level in a previous role and created tags with a hierarchical naming structure for prefixes, following the format prefix-list=key1:key2:key3

The idea is that any prefix with a prefix-list tag with value key1:key2:key3 is added into the prefix lists name

  • key1:key2:key3
  • key1:key2
  • key1

An example structure could be

  • <VRF>:<purpose>:<label>, e.g. INTERNET:CUSTOMER:<customer name here>
  • <purpose>:<region>:<device>, e.g. CUSTOMERS:DE:core01.fra01
  • etc.

This obviously can be extended to more levels if it were to be required.

NetBox scripts – now with clean error handling

Recently I wrote a scripts which aids in provisioning things inside our network, which will do some sanity checks and if all is good set up a number of things (prefixes, IPs, sub-interfaces, IPs on them, etc.). The reason to do this inside a script is to do this in an atomic operation, so either the full provision process is done, or nothing is changed at all.

If the sanity checks fail (invalid input, trying to create something with overlapping resources, etc.) the script should fail and ideally report a clear error message one what was wrong, which should be reported to the caller (via API).

Now I was looking into exiting the script on an error and only found the option to throw any Exception which will produce a stack trace of all internal Exceptions which had been caught and handled. There is a AbortTransaction Exception, which allows to terminate the script and thereby the DB transaction, but it was not designed to carry an error message.

Looking into the code it seemed like adding support to gracefully abort a would be rather straight forward to add, so I did (issue, PR). Today the PR got merged and NetBox v3.4.4 (and later) includes the AbortScript exception to elegantly abort scripts, which you can use like this:

from utilities.exceptions import AbortScript

if some_error:
     raise AbortScript("Some meaningful error message")

Modelling (C)WDM MUXes in NetBox/Nautobot – the universal way

A while ago we had a discussion in #DENOG on how to best model CWDM MUXes in NetBox/Nautobot, so they can be used to build a network topology, which can be leveraged for holistic automation, and are prepared for augments, repairs and network changes.

8Ch CWDM MUX

“Natural” way of modelling

The “natural” way of modelling for example an 8Ch CWDM MUX – as shown above – would be do create a DeviceType containing one RearPort with 8 position as well as 8 FrontPorts which map to one position each. So logically this would look like the following

Inside NetBox the Rear Port and Front Ports view of the DeviceType could look like this

One Rear Port with 8 positions
Eight Front Ports mapped to one position each

This model works absolutely, allows tracing connections through the MUXes etc. as long as we always use exactly the same MUX on both ends off the fiber for one WDM setup.

Limitations

If one MUX would decay over time and needs to be replaced by another model e.g. due to supply chain issues, which for example might have 10 channels and does not skip 1390 and 1410, the mapping would fail. This obviously would also be the case if for an expansion the setup should be changed to 18Ch MUXes and this could only be done one side after another.

Universal way of modelling

As the ITU CWDM standard only defines 18 CWDM channels in total with a fixed spacing of 20nm we can use one simple trick to overcome this limitation: Always define all 18 positions and only map the existing Front Ports to their associated position as shown in the following table.

PositionChannel
1
1270
21290
31310
41330
51350
61370
71390
81410
91430
101450
111470
121490
131510
141530
151550
161570
171590
181610

So the Front Ports of the MUX shown above would be mapped to positions 1-6, 9, and 10. This way all CWDM MUXes can be connected in NetBox/Nautobot and all channels which exist on both ends can be connected and traced through.

Eight Front Ports mapped to one their associate (existing) positions

What about DWDM?

For DWDM systems this obviously would be somewhat harder given the bigger amount of possible channel, especially when different spacing options (25, 50, 100GHz) are taken into account. It would be possible though to go for 160 positions and map the channels accordingly given strict adherence to a to be predefined map.

Custom Links in Netbox – Shortcut to device WebUI/IPMI

Netbox allows to create Custom Links to a number of models for a while now. I’ve been reminded of that feature quite recently and follow the idea to have a direct link on the device page which leads to the management interface of that device.

In the Freifunk Hochstift environment we have a number of wireless backbone links which happen to have issues now and then and require some love in that case. As we use lots of Ubnt gear that love has to be applied via the Web interface of the device which is reachable via the management IP, which is configured as the primary IP of the device in Netbox.

Up to now this meant searching for the device in Netbox and copy the IP address of the device in the browsers URL bar and hit return. This can be achieved much nicer with a custom link which directly points to https://primary_ip and is accessible via a button on the device page.

This can be achieved by creating a Custom Link in Netbox (Customization -> Custom Link) for the appropriate Content Type, Link text + URL. As the intention is to add a Custom Link to wireless backbone devices, the appropriate Content Type is DCIM > device. Button class allows to configure the color of the button.

Using a little Jinja2 in the Link text it’s possible to only show this link on WBBL devices and certain switches: If the expression(s) given there renders as empty text the link will not be shown. My first instinct was to check for the device role and manufacturer:

{% if obj.device_role.slug == 'wbbl' or
      obj.device_type.manufacturer.slug == 'netonix'
%}
WebUI
{% endif %}

But checking for the platforms makes more sense as that’s the primary indicator for the devices which are managed via a web interface and they may be used in different roles (we have wireless local links too for example):

{% if obj.platform.name in [ 'AirOS', 'Netonix' ] %}
WebUI
{% endif %}

As shown above the device or “thing” referenced by the Content Type is represented via the obj object and it’s attributes are directly accessible. A look into the API representation or the Django model(s) of the device (or “thing” for that matter) may help to figure out the correct name.

What I did not find in the docs nor API nor model is that how you can access the IP part of an IP address, which in Netbox always carries the netmask. While searching I stumbled across an issue and learned that the following is possible:

https://{{ obj.primary_ip4.address.ip }}

Netbox also allows to group custom links within a drop down. All links sharing the same Group name will show up in a drop down named like the group.

With those pieces it’s easily possible to create custom links for special devices which point to the primary IP and provide the OPS team with a few clicks solution in case of trouble. Thanks to Tim for the hint 🙂

Deploying a Freifunk Hochstift backbone POP with Netbox Scripts

Some weeks ago Network to Code held the first (virtual) Netbox Day (YouTube playlist, Slides repo on github). John Anderson gave a great NetBox Extensibility Overview and introduced me to Netbox Scripts (Video, Slide deck, Slide 28) which allow to add custom Python code to add own procedures to netbox. I was hooked. About three to four hours of fiddling, digging through the docs, and some hundred lines of Python later I had put together a procedure to provision a complete Freifunk Hochstift Backbone POP within Netbox according to our design. I’m going to share my proof of concept code here and  walk you through the key parts of the script.

Netbox scripts provide a great and really simple interface to codify procedures and design principles which apply to your infrastructure and fire up complex network setups within netbox by just entering a set of config parameters in a form like the following and a click of one button.

Provision Backbone POP form

Continue reading Deploying a Freifunk Hochstift backbone POP with Netbox Scripts