Although NetBox has a pretty nice data model and a lot of things found in common environments can be modelled pretty well, it sometimes reaches its limits. In such situations, you’re faced with multiple options to go forward
- Introduce (a number of) custom field(s) to extend the data model
- Write a plugin to extend the data model (and logic)
- Introduce a (set of) tag(s) to allow users to place bumper stickers on things
- File a feature request to add some generic missing feature
In this post we’ll look into options for using Tags to denote characteristics of devices, VMs, interfaces, prefixes, IPs, etc.
Simple labels
Sometimes it’s enough to just label a device, an interface, etc. with a static bit of information. Examples would be
- Enable backup on this device (e.g. tag backup)
- Enable DHCP on this interface (e.g. tag DHCP)
- Mark an interface as planned or offline (e.g. tags planned or offline)
- Denote an interface is of type Wireguard (e.g. tag Wireguard)
- etc.
For those cases you can create a tag, e.g. planned, and apply it to any interface which is configured in NetBox, should be configured on the device but isn’t connected yet, so that effectively you can push down (parts of) the interface configuration to the device but inhibit alarms for it being offline or IGP adjacencies being down. The same is true for device which need to be backed up, etc.
One way of thinking of these example is as a boolean switch, which is set to true if the tag is applied. This is easy for cases where the “false” value is the default, so only the outliers – meaning “true” values – need to be represented explicitly.
Semantic labels
But what to do when there is a need for a tri-state value, e.g. true, false, unset, with unset being the default?
One example would be a part of an SDN controller which figures out if uRPF should be enabled on a given interface or not. This usually can be done programmatically, but in some situations an explicit override may be required. That’s where – what I would call them – Semantic Labels come in!
This means, that we also put the value we want to assign a given label into the tag. In this case, we create two labels called urpf=on as well as urpf=off (or urpf=enable and urpf=disable as you fancy) and apply these to any interface requiring an explicit override. If no tag is present, the code decides about the fate of uRPF.
Why not use custom fields?!
At this point you may be wondering “Why bother?” Just create a custom field, you can provide the allowed options and get input validation for free!
The reason is that if you go down this path, you can create a fairly long list of custom fields in the UI (and API) which are likely not set for the majority of your interfaces (in this example). This creates clutter within the UI and is likely to confuse users, especially if you end up with a number of custom fields.
My rule of thumb is, that I only create a custom field if it’s relevant for all or at least the majority of entities of a given kind. For example, if you wanted to store the data center tier of all the DC (read: Sites) you are present in, it might make sense to store this information as a custom field on the Site model, with a predefined list of values (1 – 4).
More examples
In the example above we could also have created two labels, e.g. uRPF enable and uRPF disable and let our automation handle the differentiation – which actually is how the FFHO SDN is built as of today.
For other bits of information, with more possible values, the benefits of the key=value approach can shine, for example if you want to
- explicitly set the OSPF cost of an interface (e.g. ospf_cost=100)
- store the maximum capacity of VRFs of a box (e.g. capacity=62 for a box with a Mellanox Spectrum 1 ASIC with a default + mgmt VRF in place)
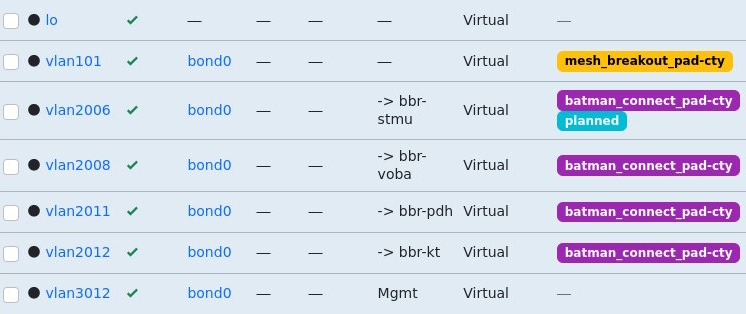
Although I now prefer the key=value approach as it’s easy to recognize and parse, you can obviously place values in labels by following any common format you define. For the Freifunk Hochstift Backbone I introduced labels of the format batman_connect_<instance_name> (e.g. batman_connect_pad-cty) to enable B.A.T.M.A.N. adv. overlay for a given instance on a tagged interface.

The next level – prefix lists
Oliver – takt – Geiselhardt-Herms took this to the next level in a previous role and created tags with a hierarchical naming structure for prefixes, following the format prefix-list=key1:key2:key3…
The idea is that any prefix with a prefix-list tag with value key1:key2:key3 is added into the prefix lists name
- key1:key2:key3
- key1:key2
- key1
An example structure could be
- <VRF>:<purpose>:<label>, e.g. INTERNET:CUSTOMER:<customer name here>
- <purpose>:<region>:<device>, e.g. CUSTOMERS:DE:core01.fra01
- etc.
This obviously can be extended to more levels if it were to be required.